
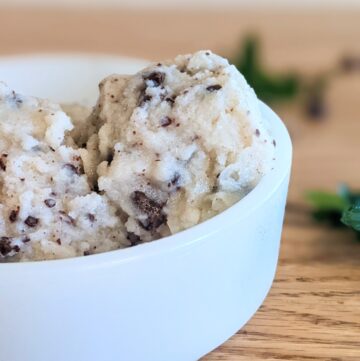
The best ice cream you’ll ever have will always be homemade ice cream. There are many different ways to make I cream and lots of different recipes. Here I will show you 2 different methods of churning, with a ice cream maker and Hand Churning, as well as a No Cook recipe and a Cooked Custard recipe. My goal is to teach you these techniques in a way in which you can adjust the recipe in a way where you can make your best version of homemade ice cream with what you have at home. Although the different methods do make it turn out a little differently I have still found not matter how I make me and my family still can’t get enough.


Ingredients
- Milk.
Whole milk is best for the creamiest results but 2% or even fat free still works. The quality of the texture of your ice cream is depended on the milk you choose. There is a difference and whole milk taste better but for my own healthy needs I often choose fat free and it still works. - Cream.
Yes, milk and cream. Not whipping cream, just normal heavy cream. If you don’t have cream half and half will also work. The fat in the cream helps keep the ice cream from freezing completely, keep your dessert from getting icy and allowing for smooth scooping. So using heavy cream is best but half and half will also work. I have also make this recipe without cream or half and half, just fat free milk and it does turn out, but it’s not rich and creamy, just milky. The texture is not perfect but my kids still loved it. If you try to make your ice cream too healthy by using fat free milk, reducing the sugar and leaving out the eggs you will get icy hard ice cream. Not ideal.


- Chocolate Chips
Dark, chocolate, milk chocolate, semi-sweet chocolate, mint chocolate…. its up to you what type of chocolate chips you want. The chocolate chip helps bring out a rich chocolatey flavor. The chocolate flavor depends a lot on the quality of your cocoa powder but the chocolate chips will help give a solid base for success in case the quality of the cocoa powder is not as excellent as you would want. - Cocoa Powder
Good Cocoa Powder is important. The quality of the flavor of your chocolate ice cream depends on the quality of your cocoa powder. A cheaper poorer quality of cocoa results in more of a bitter mild chocolate taste. Good quality cocoa powder will result in a richer, deeper flavor.


- Sugar
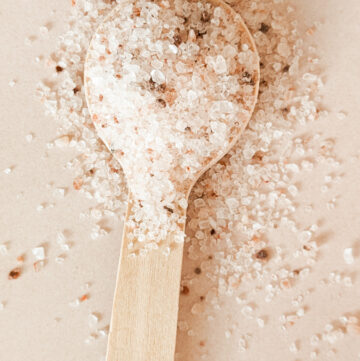
Sugar doesn’t just make the ice cream sweet, it also, along with the cream, helps keep the texture creamy. Sugar will change the freezing point of the milk. Keeping the ice cream from solidifying completely making it easy to scoop and delicious to eat! - Salt.
Just a little, but just enough to bring out the flavor in your ingredients.


- Egg Yokes. In the quick uncooked ice cream method these eggs will be raw. If you don’t like the idea of that stick with the custard method or don’t add them. The flavor and texture of with the eggs is just so much better. I’ve made ice cream enough times without eggs to know that leaving them out is not worth it. So I very much encourage not skipping this ingredient.
How to Make a Quick (No Cook) Ice Cream
Now, I say quick but It still takes at least 1 hour because your frozen dessert needs to freeze.
This method is simple.
- Mix ingredients together in a blender.
First mix the dry ingredients together in the blender. Your goal is to make the chocolate chips as small as you can. Unless you want more chocolate chunks in your ice cream then you can leave them big. I prefer them blended into a powder. You can also hand mix these ingredients but your chocolate chips will be whole. Once your dry ingredients are the desired consistency add your wet and ingredients until fully mixed together.


- Pour into an ice cream maker and churn for 20 minutes.
If you are using a KitchenAid Ice Cream bowl and attachment, turn the mixer on stir. Do not go any faster. You want to churn your ice cream slowly. If you are using an old fashioned ice cream maker or an electric ice cream maker follow the directions that came with your machine. Sadly I am not versed with every brand.


- Freeze for 20 minutes.
The longer you churn the warmer your bowl is going to get. So I put it back in the freezer for 20 – 30 minutes to help keep everything cold. Leave the blade/mixer in the bowl. - Churn again for another 10 minutes.
When I bring it back out of the freezer I first break it up a little with a spoon. I don’t want it to be so hard that the mixer doesn’t work. It will seem at this point that it’s getting softer at first and not as frozen but then the ice cream will seem to increase and in my case, overflow a little bit. This is good. - Freeze for another 20 minutes before serving.
By this time it might be close to a soft serve texture and you can serve it if you like. I will give my kids a spoonful and then place back in the freezer for another 20 minutes (or longer) to solidify a bit more. After that scoop away!
How to Make a Frozen Custard
This method requires you to cook your ice cream ingredients before churning it. A true custard would be a few more eggs then my recipe, making things a big thicker but for ice cream I find 3 is enough. If you want it thicker, more custardy, add 2 more egg yokes and cook until it starts to become thick. This method takes closer to 2-3 hours to complete due to the cooking and cooling process.

- Mix ingredients all ingredients
Mix together in a blender or mix by hand in a pot. Either way as you will be cooking and melting everything together on the stove. - Heat on medium to medium high heat.
Heat the ingredients on the stove to a light simmer and let simmer for about 10 minutes. The goal is to get the sugar to melt and the eggs to be cooked. Stir continuously and don’t let it come to a full boil. If you want a thick custard like consistency you may need to add 2 more egg yokes and cook a little longer. I find when making ice cream it doesn’t matter too much if you get the mixture to become a full custard before placing it in the ice cream maker or not. Our goal is ice cream, not custard. - Let cool completely.
You really don’t want to put a hot mixture in your ice cream machine. It won’t freeze. So pour into another bowl, cool on the counter till it stops steaming then place in the refrigerator for an hour. Once completely cool you can start the churning process. - Pour into an ice cream maker and churn for 20 minutes.
If you are using a KitchenAid Ice Cream bowl and attachment, turn the mixer on stir. Do not go any faster. You want to churn your ice cream slowly. If you are using an old fashioned ice cream maker or an electric ice cream maker follow the directions that came with your machine. Sadly I am not versed with every brand. - Freeze for 20 minutes.
The longer you churn the warmer your bowl is going to get. So I put it back in the freezer for 20 – 30 minutes to help keep everything cold. Leave the blade/mixer in the bowl. - Churn again for another 10 minutes.
When I bring it back out of the freezer I first break it up a little with a spoon. I don’t want it to be so hard that the mixer doesn’t work. It will seem at this point that it’s getting softer at first and not as frozen but then the ice cream will seem to increase and in my case, overflow a little bit. This is good. - Freeze for another 20 minutes before serving.
By this time it might be close to a soft serve texture and you can serve it if you like. I will give my kids a spoonful and then place back in the freezer for another 20 minutes (or longer) to solidify a bit more. After that scoop away!

How to Hand Churn Ice Cream.
If you don’t have an ice cream maker do not fret! The ice cream maker makes things real easy and quick(er) but hand churning is very possible. Here’s how you do it.
- Mix all ingredients, cook or no cook (choose a method from above)
- Place in freezer for 30 minutes.
- Stir slowly for 1 minute.
- Freeze for 20 minutes.
- Stir slowly for 1 minute.
- Freeze for 10 minutes.
- Stir slowly for 1 minute.
- Freeze for 10 minutes.
- Stir slowly for 1 minute
- Repeat the 10 minutes in the freezer and stirring pattern a few more times until it gets to a soft serve/ice like consistency.
If it doesn’t seem to be getting to the consistency you think it should be that’s okay, just give it more time in the freezer and don’t feel like you need to keep stirring all day. Give it an hour then just let it freeze.
The timing is not the important part of the method its the consistency of slowly stirring the ice cream. The reason why I have you wait 30 minutes at first, then 20 and then go down to 10 instead of just saying stir every 10 minutes for an hour is because I believe the churning/stirring doesn’t seem to really do anything until the cream starts to freeze. It needs to be cold and 10 minutes in the freezer doesn’t get it there fast enough. All that to say, If you want to simplify it even more for yourself you can just stir it every 10 minutes and eventually you will get there.

Chocolate Ice Cream
Ingredients
- 3 cups whole milk
- 1 cup cream
- 1 cup sugar
- 1 cup chocolate chips
- 1/2 cup cocoa powder
- 3 egg yokes
- 1/2 teaspoon salt
Instructions
Quick 1 hour (no cook)
Mix all ingredients together in blender
Poor into ice cream maker
Churn for 20 minutes
Place the bowl and all into the freezer for 30 minutes
Churn for another 10 minutes
Freeze again for at least 20 minutes before serving.
Custard 2+ hours (cooked)
Mix all ingredients together in a pot
Bring to a simmer for 10 minutes while continuously stirring
Let cool completely on counter and refrigerate for 1 hour.
Poor into ice cream maker
Churn for 20 minutes
Place the bowl and all into the freezer for 30 minutes
Churn for another 10 minutes
Freeze again for at least 20 minutes before serving.


Leave a Reply